ভূমি মন্ত্রণালয়
গণপ্রজাতন্ত্রী বাংলাদেশ সরকার · People's Republic of Bangladesh

User Guide — ভূমি দৃষ্টি

Geofencing Attendance System Application
📲
অ্যাপটি ডাউনলোড করুন গুগল প্লে স্টোর বা অ্যাপ স্টোর থেকে অ্যাপটি ডাউনলোড করুন
ডাউনলোড করুন ↓
পরিচিতি

ভূমি মন্ত্রণালয় গণপ্রজাতন্ত্রী বাংলাদেশ সরকারের একটি মন্ত্রণালয়। ভূমি ব্যবস্থাপনা, ভূমি রাজস্ব আদায়, ভূমি জরিপ ও রেকর্ড সংরক্ষণ, খাসজমি ব্যবস্থাপনা এবং ভূমি সংক্রান্ত নীতি প্রণয়ন ও বাস্তবায়ন এই মন্ত্রণালয়ের দায়িত্ব। মাঠপর্যায়ে বিভাগীয় কমিশনার কার্যালয়, জেলা প্রশাসক কার্যালয়, উপজেলা ভূমি অফিস ও ইউনিয়ন ভূমি অফিসের মাধ্যমে মন্ত্রণালয়ের কার্যক্রম পরিচালিত হয়।

ডিজিটাল সেবা সম্প্রসারণের ধারাবাহিকতায় কর্মকর্তা-কর্মচারীদের উপস্থিতি ব্যবস্থাপনা সহজ, স্বচ্ছ ও নির্ভুল করতে ভূমি দৃষ্টি — জিও-ফেন্স বেজড অ্যাটেনডেন্স সিস্টেম চালু করা হয়েছে। অফিসের নির্ধারিত সীমানা (জিও-ফেন্স) অনুযায়ী উপস্থিতি যাচাই হয়, মাঠপর্যায়ের সাইট ভিজিট অবস্থানসহ নথিবদ্ধ থাকে এবং কর্মঘণ্টা ও ছুটির হিসাব স্বয়ংক্রিয়ভাবে সংরক্ষিত হয়।
জিও-ফেন্স উপস্থিতি
অফিস সীমানার ভেতরে থেকেই চেক-ইন ও চেকআউট।
সাইট ভিজিট
অফিসের বাইরের কাজ অনুমোদনসহ নথিবদ্ধ।
SSO দিয়ে প্রবেশ
LSG পোর্টাল বা GEMS পরিচয় দিয়ে নিরাপদ লগইন।
শুরু করার আগে
ধাপে ধাপে ব্যবহার
ধাপ ০১
কীভাবে লগইন করবেন
অ্যাপে প্রবেশ করতে হয় সরকারি একক সাইন-ইন (SSO) ব্যবস্থার মাধ্যমে। অ্যাপের জন্য আলাদা অ্যাকাউন্ট খুলতে হয় না — LSG পোর্টাল অথবা GEMS-এর পরিচয় দিয়েই প্রবেশ করা যায়।
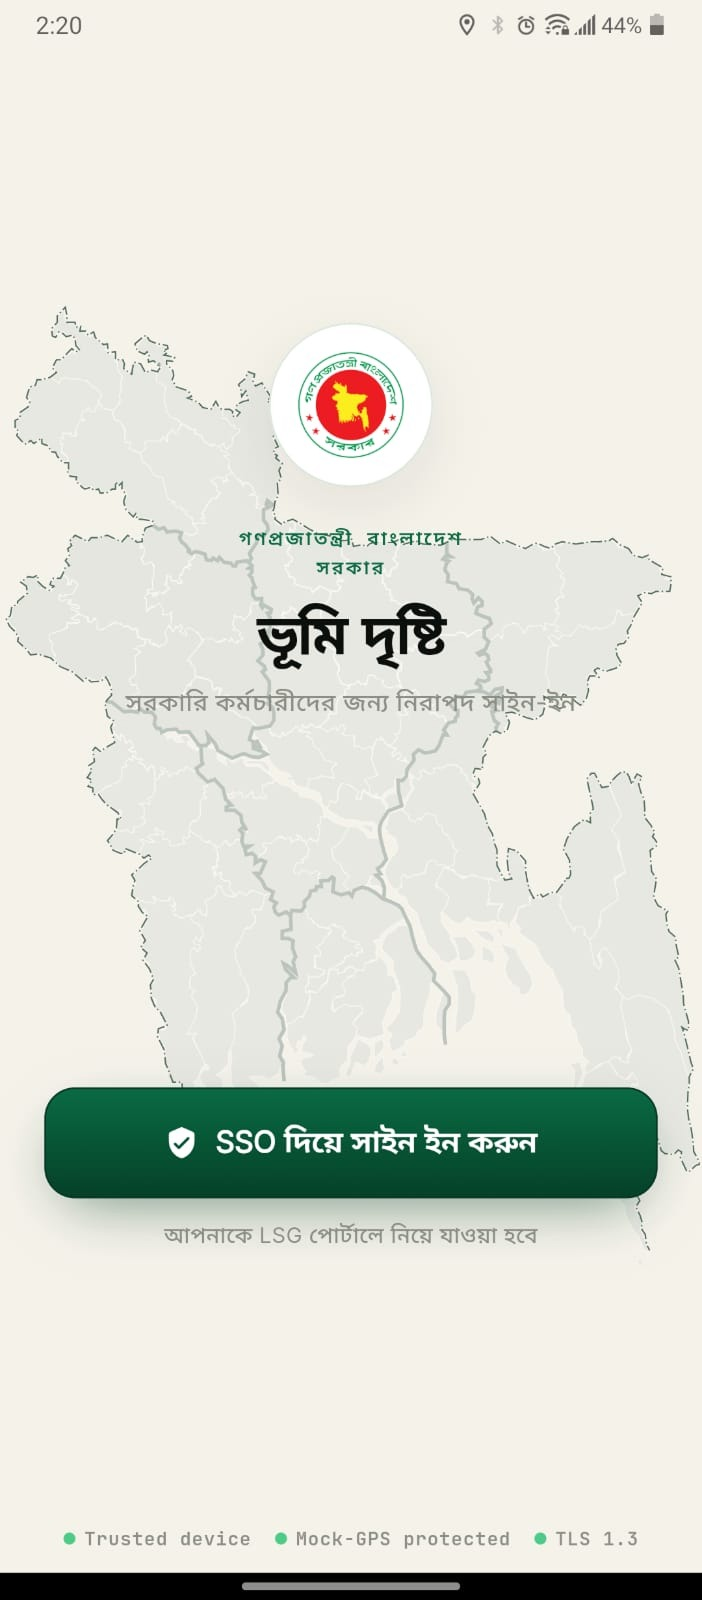
  1. ফোনের হোম স্ক্রিন থেকে ভূমি দৃষ্টি অ্যাপটি খুলুন। প্রথমে ভূমি মন্ত্রণালয়ের প্রারম্ভিক পর্দা দেখা যাবে।
  2. স্বাগত স্ক্রিনে সবুজ SSO দিয়ে সাইন ইন করুন বোতামে চাপ দিন। নিচে লেখা থাকবে — "আপনাকে LSG পোর্টালে নিয়ে যাওয়া হবে"।
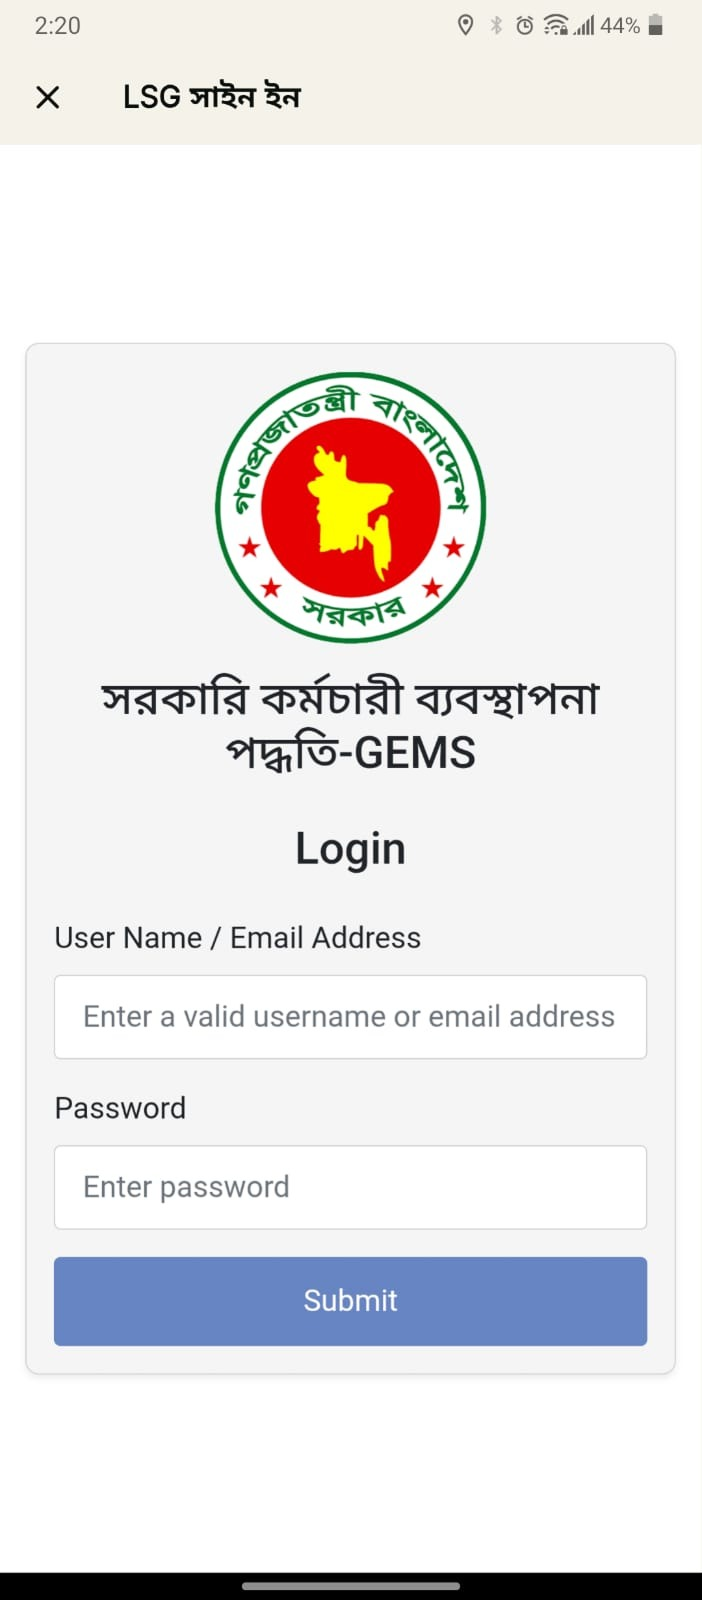
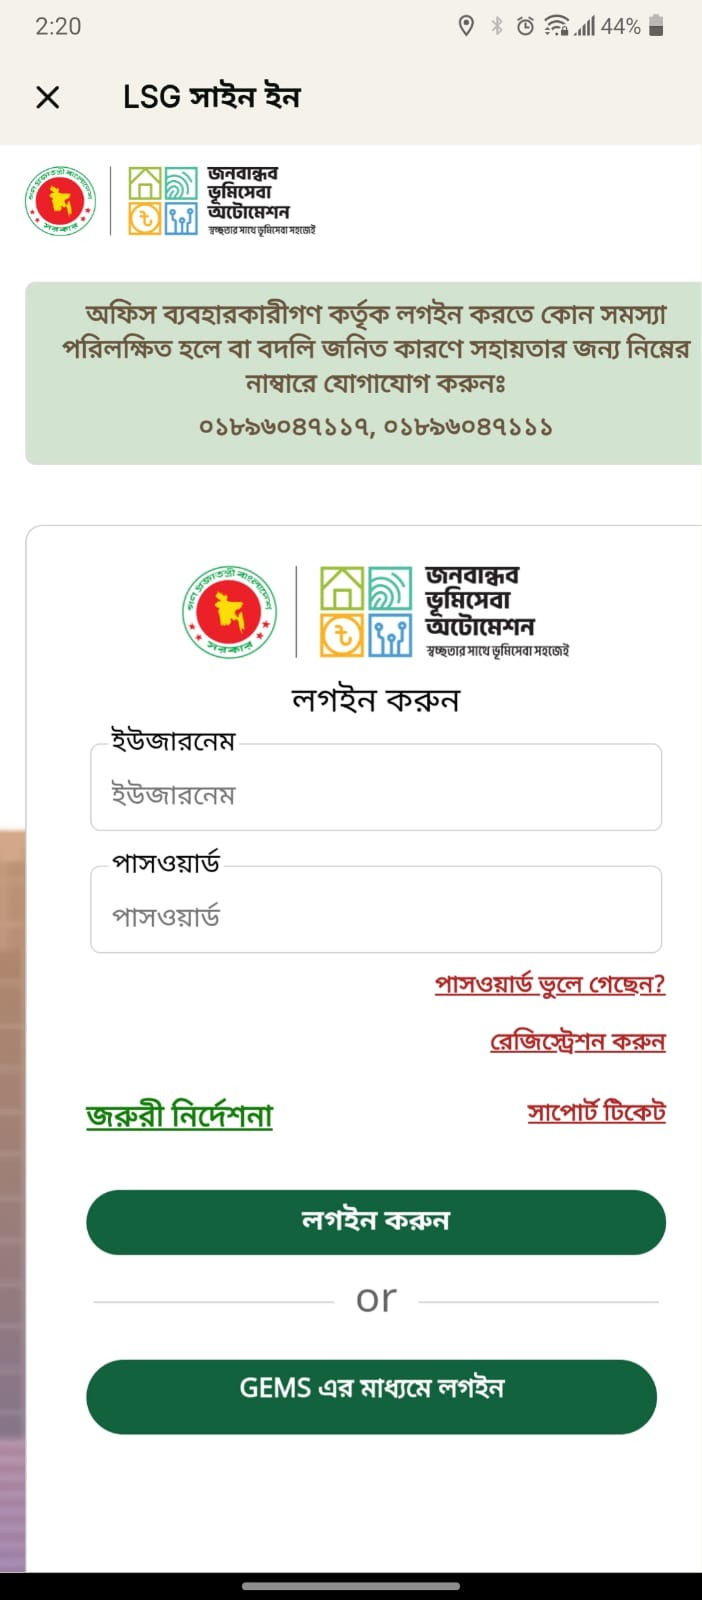
  3. LSG সাইন ইন পাতা খুলবে। ইউজারনেম ও পাসওয়ার্ড লিখে লগইন করুন চাপুন।
  4. GEMS পরিচয় ব্যবহার করতে চাইলে একই পাতার নিচে GEMS এর মাধ্যমে লগইন চাপুন; সেখানে User Name / Email Address ও Password দিয়ে Submit করুন।
  5. যাচাই সফল হলে অ্যাপ সরাসরি হোম স্ক্রিনে নিয়ে যাবে।
স্ক্রিনের নিচের সূচক — Trusted device, Mock-GPS protected ও TLS 1.3 লেখা থাকলে বুঝবেন ডিভাইস ও সংযোগ নিরাপদ।
SSO সাইন ইন LSG সাইন ইন
LSG সাইন ইন পাতায় কী কী থাকে
ইউজারনেম ও পাসওয়ার্ড — LSG পোর্টালে নিবন্ধিত পরিচয়।
পাসওয়ার্ড ভুলে গেছেন? — পাসওয়ার্ড পুনঃনির্ধারণের লিংক।
রেজিস্ট্রেশন করুন — নতুন ব্যবহারকারীর নিবন্ধন।
জরুরী নির্দেশনা ও সাপোর্ট টিকেট — নির্দেশনা ও সহায়তার আবেদন।
GEMS এর মাধ্যমে লগইন — বিকল্প পরিচয়ে প্রবেশ।
সহায়তা — অফিস ব্যবহারকারীদের লগইনে সমস্যা হলে বা বদলিজনিত কারণে যোগাযোগ: ০১৮৯৬০৪৭১১৭, ০১৮৯৬০৪৭১১১।
GEMS লগইন পাতা
হোম স্ক্রিন পরিচিতি
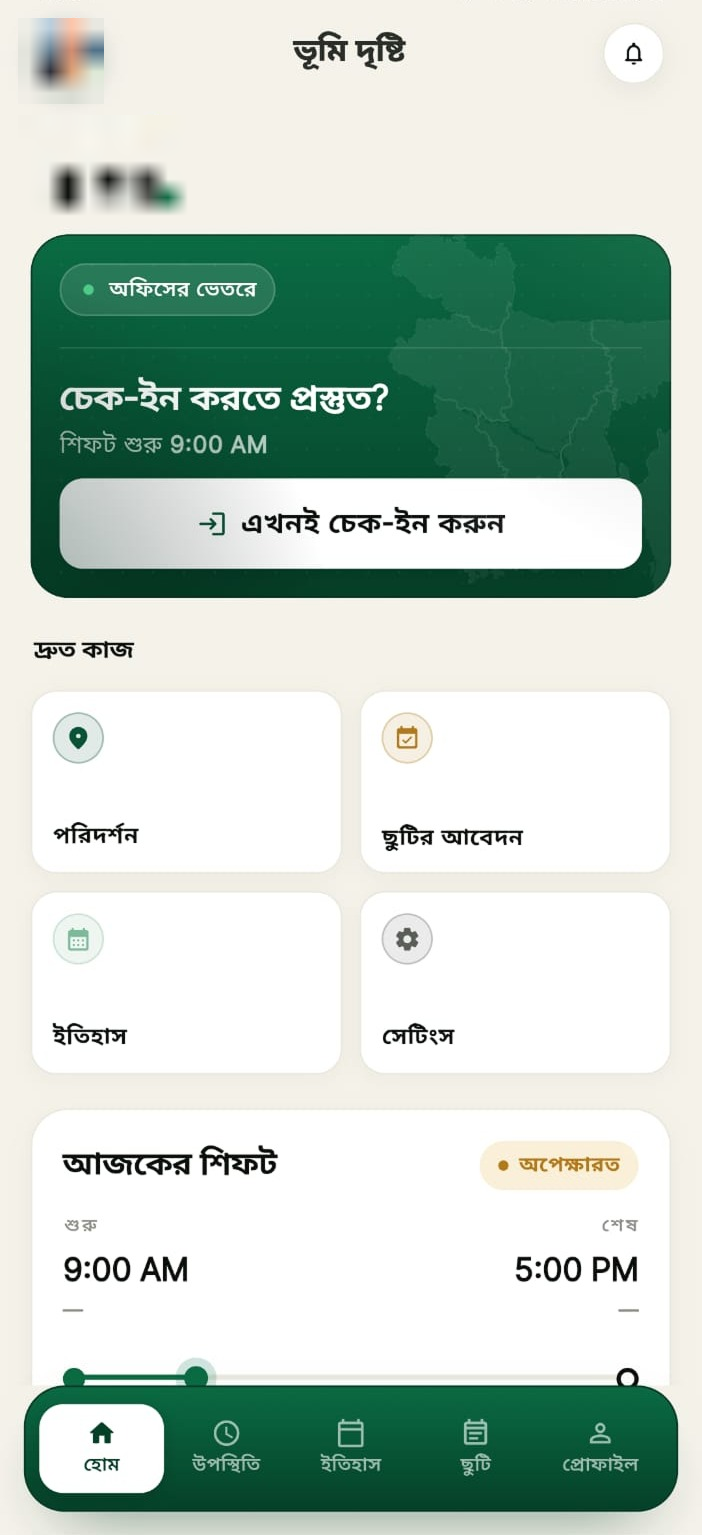
লগইনের পর প্রথমেই এই স্ক্রিনটি আসে। উপরে আপনার নাম ও ছবি, নিচে দিনের উপস্থিতির অবস্থা এক নজরে দেখা যায়।
অফিসের ভেতরে — আপনি এখন জিও-ফেন্স সীমানার ভেতরে আছেন কি না।
চেক-ইন করতে প্রস্তুত? — শিফট শুরুর সময়সহ এখনই চেক-ইন করুন বোতাম; এখান থেকেও সরাসরি চেক-ইন করা যায়।
দ্রুত কাজ — পরিদর্শন, ছুটির আবেদন, ইতিহাস ও সেটিংসের শর্টকাট।
আজকের শিফট — শুরু ও শেষের সময় এবং অবস্থা (যেমন অপেক্ষারত)।
নিচের মেনু — হোম, উপস্থিতি, ইতিহাস, ছুটি ও প্রোফাইল।
হোম স্ক্রিন
ধাপ ০২
কীভাবে চেক-ইন করবেন
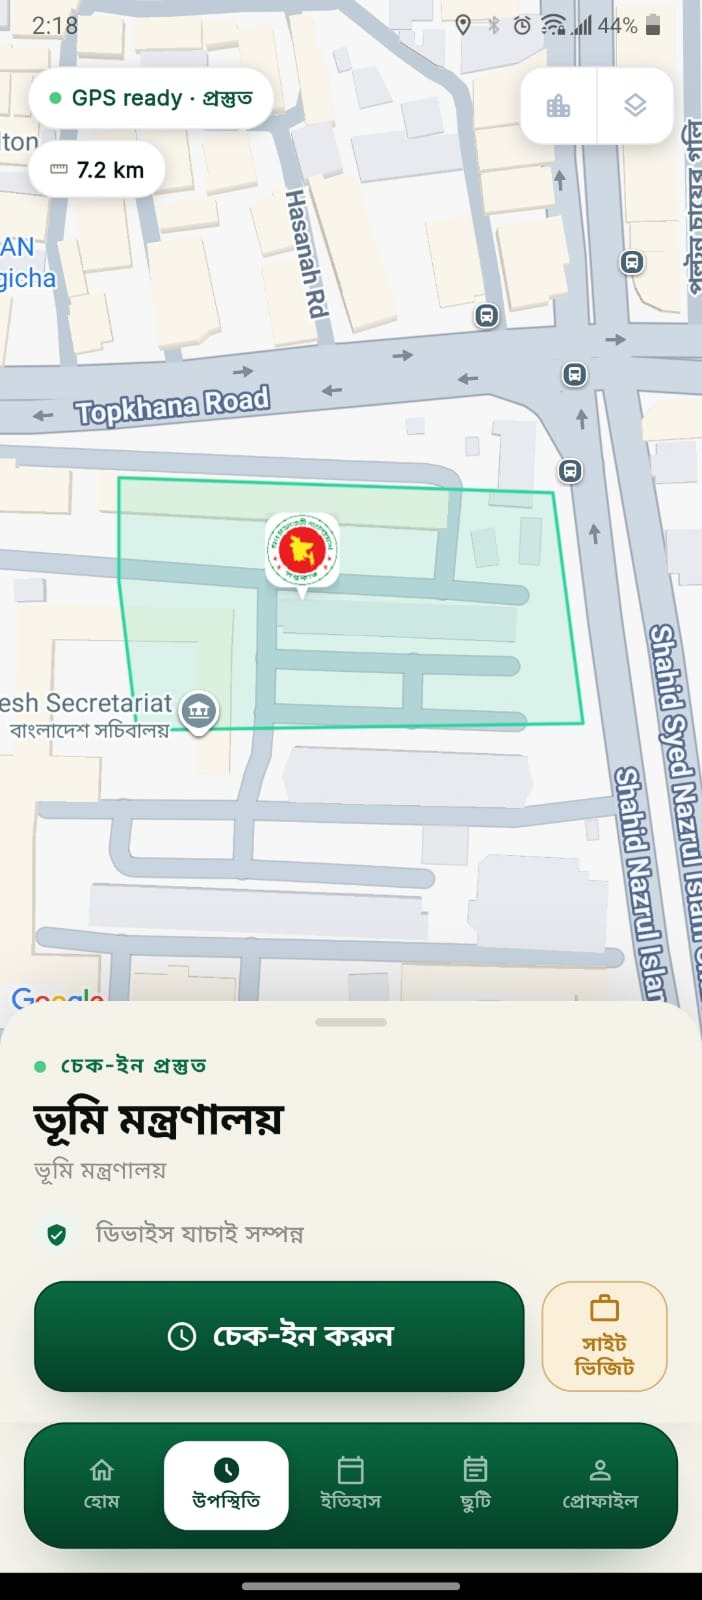
চেক-ইন করতে হলে আপনাকে অফিসের নির্ধারিত জিও-ফেন্স সীমানার (মানচিত্রে সবুজ চতুর্ভুজ) ভেতরে থাকতে হবে।
  1. নিচের মেনু থেকে উপস্থিতি ট্যাবে চাপ দিন।
  2. মানচিত্র লোড হওয়া পর্যন্ত অপেক্ষা করুন। উপরে বাঁ পাশে GPS ready · প্রস্তুত দেখা গেলে অবস্থান নির্ণয় সম্পন্ন; নিচের ব্যাজে সীমানা থেকে দূরত্ব (যেমন 7.2 km) দেখাবে।
  3. নিচের কার্ডে চেক-ইন প্রস্তুত, অফিসের নাম এবং ডিভাইস যাচাই সম্পন্ন চিহ্ন দেখা যাবে।
  4. সবুজ চেক-ইন করুন বোতামে চাপ দিন।
  5. চেক-ইন সফল হলে স্ট্যাটাস Session active · সক্রিয় হবে এবং কর্মঘণ্টার ঘড়ি চালু হবে।
সীমানার বাইরে থাকলে চেক-ইন করা যাবে না। দূরত্ব দেখে অফিস এলাকার ভেতরে গিয়ে আবার চেষ্টা করুন।
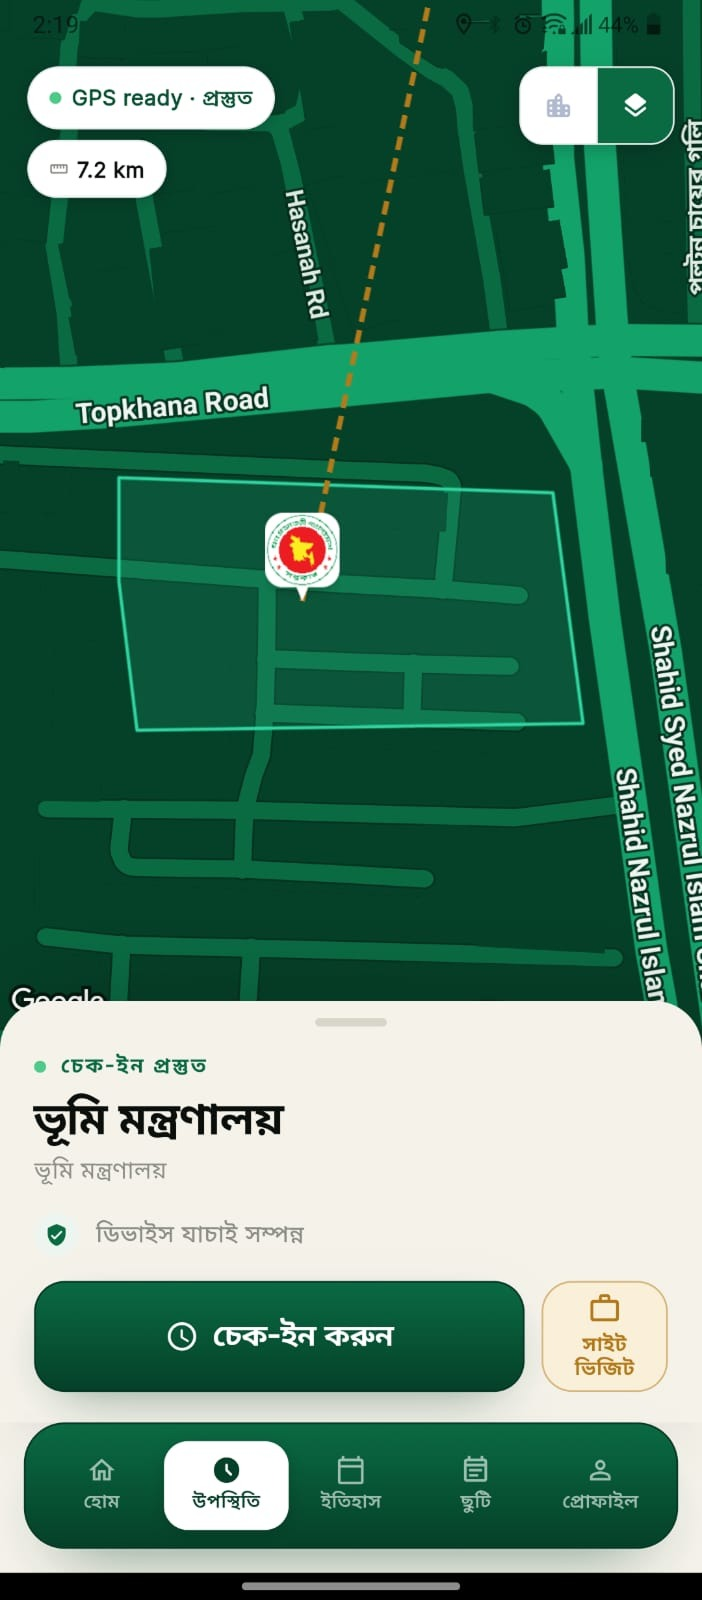
চেক-ইন প্রস্তুত — সাধারণ মানচিত্র চেক-ইন প্রস্তুত — গাঢ় মানচিত্র
মানচিত্রের ধরন পরিবর্তন
মানচিত্রের উপরে ডান কোণে দুটি বোতাম আছে। এগুলো দিয়ে সাধারণ মানচিত্র ও গাঢ় (ডার্ক) মানচিত্রের মধ্যে পরিবর্তন করা যায়। দিনের আলোয় সাধারণ মানচিত্র এবং কম আলোয় গাঢ় মানচিত্র পড়তে সুবিধা হয়। মানচিত্রের ধরন যা-ই হোক, চেক-ইনের নিয়ম একই থাকে।
ধাপ ০৩
কীভাবে চেকআউট করবেন
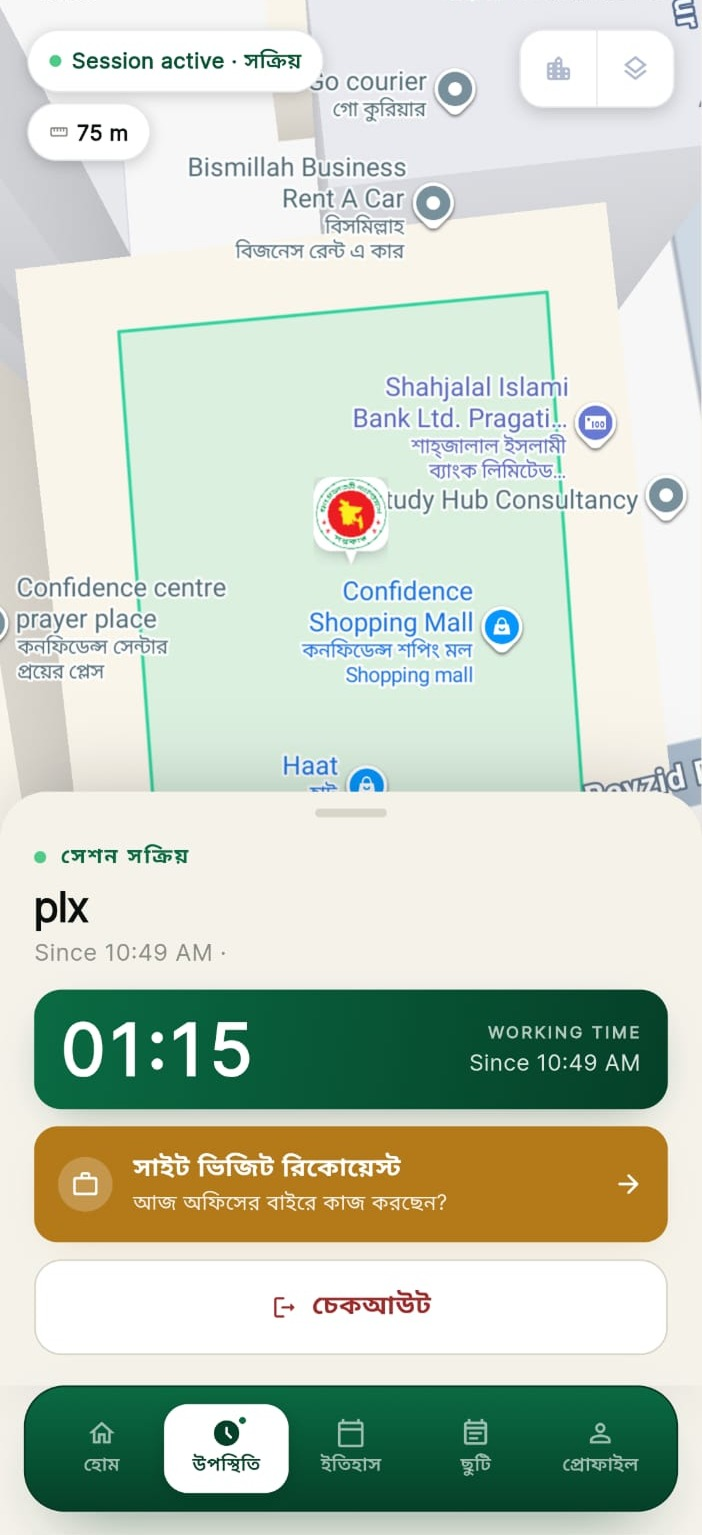
কর্মদিবস শেষে চেকআউট করলে দিনের মোট কর্মঘণ্টা হিসাব করা হয়। চেকআউট না করলে উপস্থিতি অসম্পূর্ণ থাকবে।
  1. উপস্থিতি ট্যাবে যান। উপরে Session active · সক্রিয় এবং নিচের কার্ডে সেশন সক্রিয় দেখা যাবে।
  2. সবুজ কার্ডে WORKING TIME (যেমন 01:15) ও চেক-ইনের সময় (Since 10:49 AM) যাচাই করুন।
  3. সাদা চেকআউট বোতামে চাপ দিন।
  4. নিশ্চিতকরণ চাইলে তথ্য দেখে নিশ্চিত করুন; ভুল হলে বাতিল করে ফিরে যান।
  5. চেকআউট সম্পন্ন হলে সেশন বন্ধ হবে এবং দিনের হিসাব ইতিহাস ট্যাবে সংরক্ষিত থাকবে।
সেশন সক্রিয় থাকা অবস্থায় সীমানা থেকে দূরত্ব (যেমন 75 m) উপরে দেখা যায়। অফিসের বাইরে যেতে হলে চেকআউট না করে সাইট ভিজিট রিকোয়েস্ট ব্যবহার করুন।
সক্রিয় সেশন ও চেকআউট
ধাপ ০৪
সাইট ভিজিট রিকোয়েস্ট
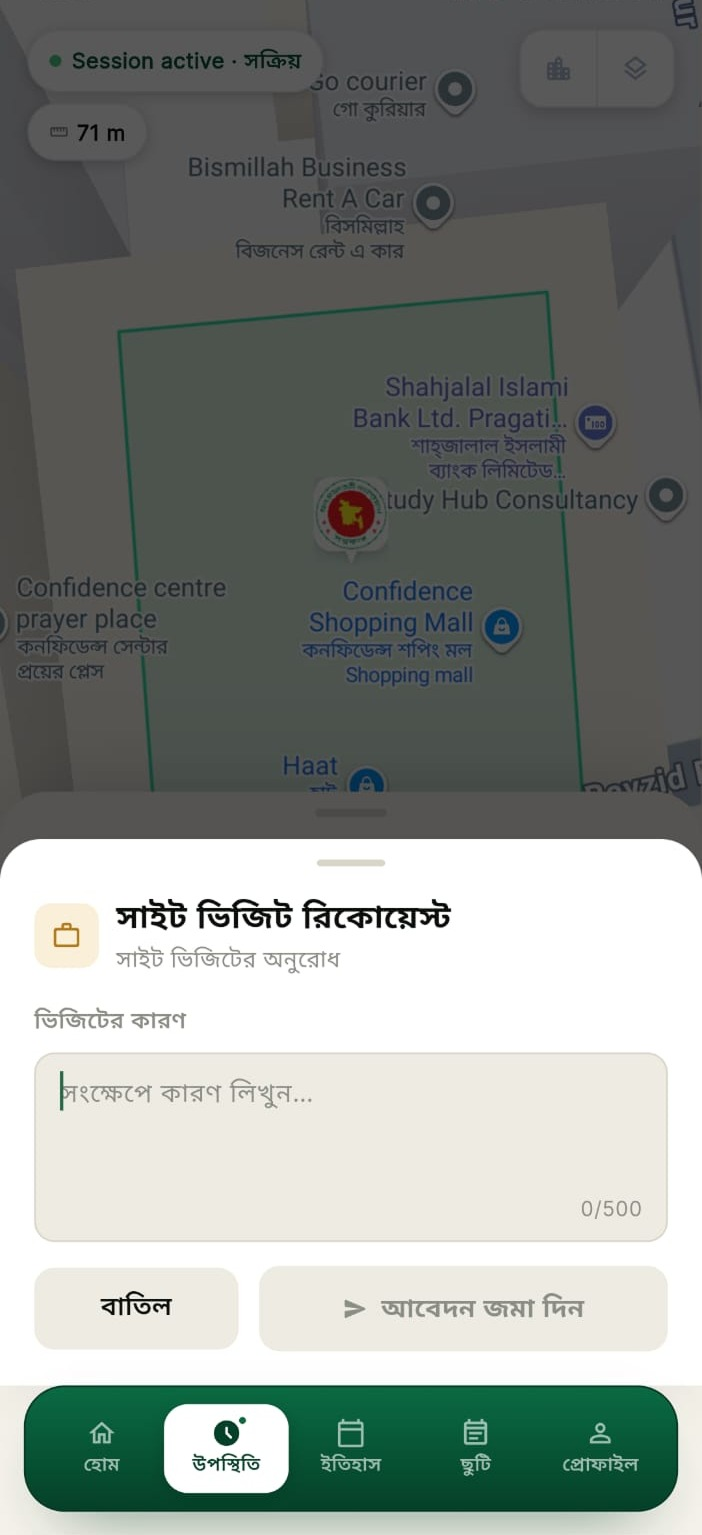
অফিসের বাইরে সরকারি কাজে (মাঠ পরিদর্শন, জরিপ, শুনানি) যেতে হলে সাইট ভিজিটের আবেদন করতে হয়। এতে অফিসের বাইরে থাকা সময়টুকু কর্মঘণ্টা হিসেবে গণ্য হয়।
  1. উপস্থিতি ট্যাবে সক্রিয় সেশনের কার্ডে সাইট ভিজিট রিকোয়েস্ট অংশে চাপ দিন। চেক-ইনের আগে হলে চেক-ইন কার্ডের পাশে সাইট ভিজিট বোতামটি ব্যবহার করুন।
  2. ভিজিটের কারণ ঘরে সংক্ষেপে কারণ লিখুন (সর্বোচ্চ ৫০০ অক্ষর)।
  3. আবেদন জমা দিন চাপুন। ভুল হলে বাতিল চেপে ফিরে যান।
  4. আবেদন জমা হলে অ্যাপ আপনার অবস্থান ও সময় সংরক্ষণ করবে এবং অনুমোদনের অবস্থা ইতিহাস → সাইট ভিজিট অংশে দেখা যাবে।
সাইট ভিজিট রিকোয়েস্ট
উপস্থিতির ইতিহাস
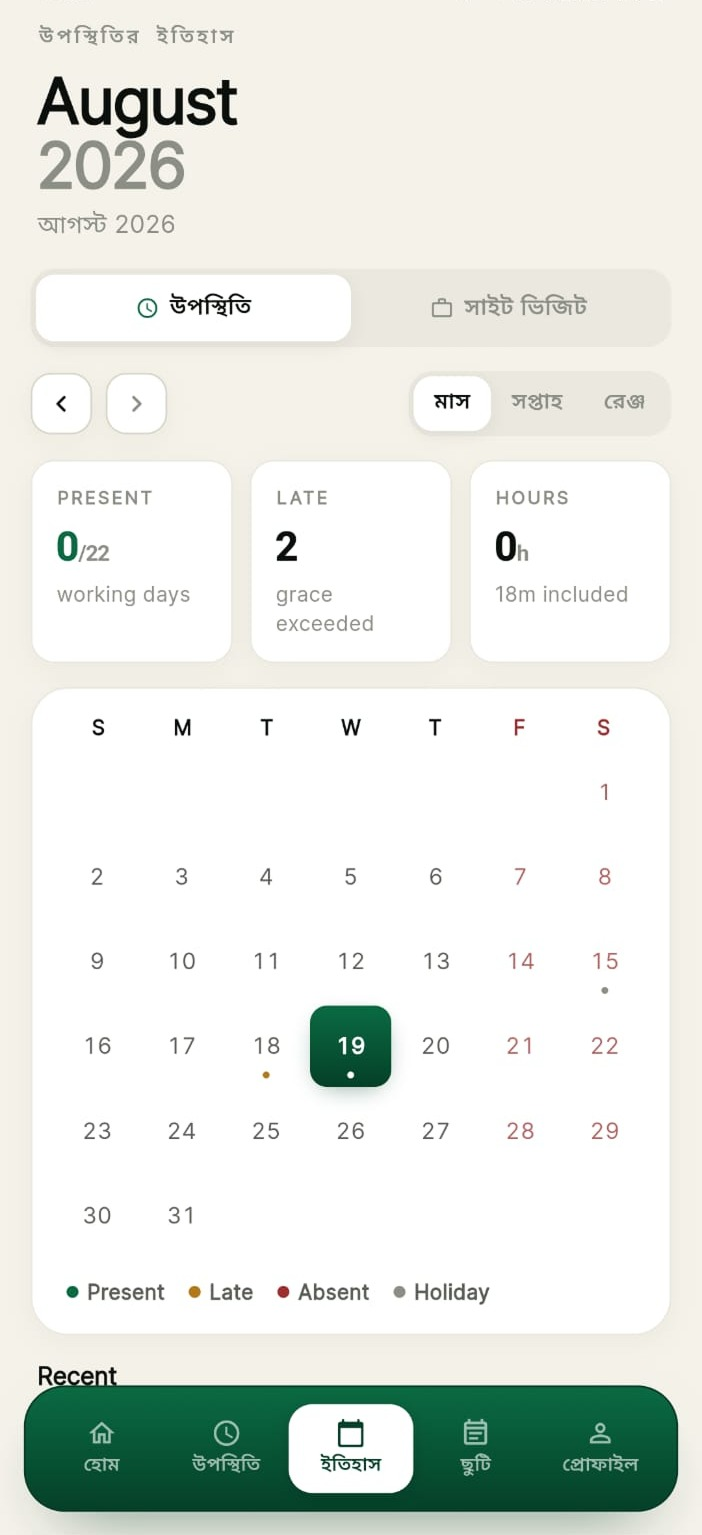
ইতিহাস ট্যাবে মাসভিত্তিক ক্যালেন্ডারে দিনের অবস্থা দেখা যায়।
  1. উপরের উপস্থিতি ও সাইট ভিজিট ট্যাব দিয়ে দুই ধরনের ইতিহাস আলাদাভাবে দেখা যায়।
  2. মাস, সপ্তাহ বা রেঞ্জ নির্বাচন করে সময়সীমা পরিবর্তন করুন; তির চিহ্ন দিয়ে আগের বা পরের মাসে যান।
  3. উপরের তিনটি কার্ডে মাসের সারসংক্ষেপ — PRESENT (উপস্থিত দিন), LATE (দেরি) ও HOURS (মোট কর্মঘণ্টা)।
  4. ক্যালেন্ডারের রঙের অর্থ — Present উপস্থিত, Late দেরি, Absent অনুপস্থিত, Holiday ছুটির দিন।
  5. কোনো তারিখে চাপ দিলে ওই দিনের বিস্তারিত তথ্য নিচের Recent অংশে দেখা যাবে।
উপস্থিতির ইতিহাস ক্যালেন্ডার
সাইট ভিজিট ইতিহাস
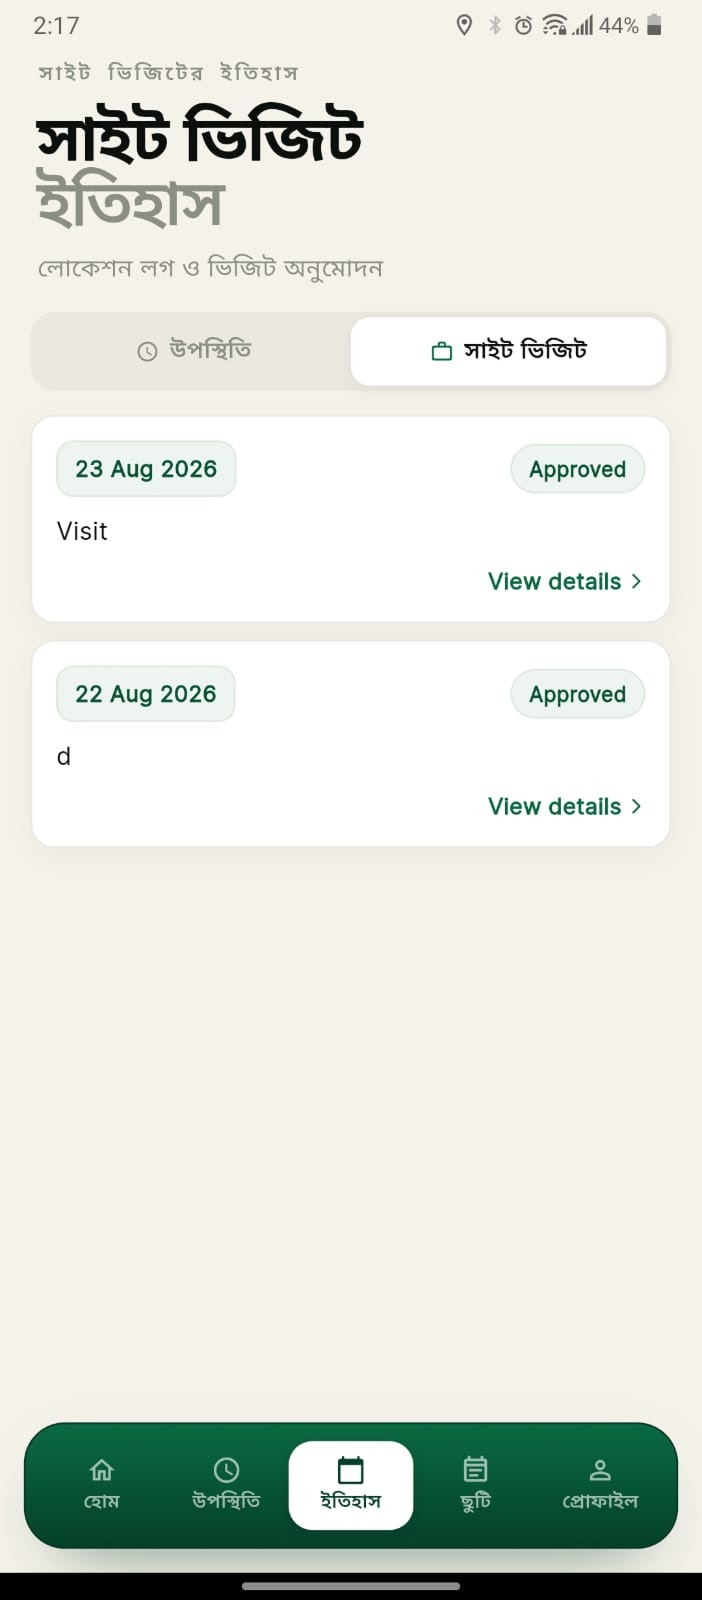
ইতিহাস → সাইট ভিজিট অংশে আপনার সব ভিজিটের তালিকা তারিখ ও অনুমোদনের অবস্থাসহ থাকে।
  1. তালিকায় প্রতিটি ভিজিটের তারিখ, কারণ এবং অবস্থা (Approved ইত্যাদি) দেখা যাবে।
  2. বিস্তারিত দেখতে View details চাপুন।
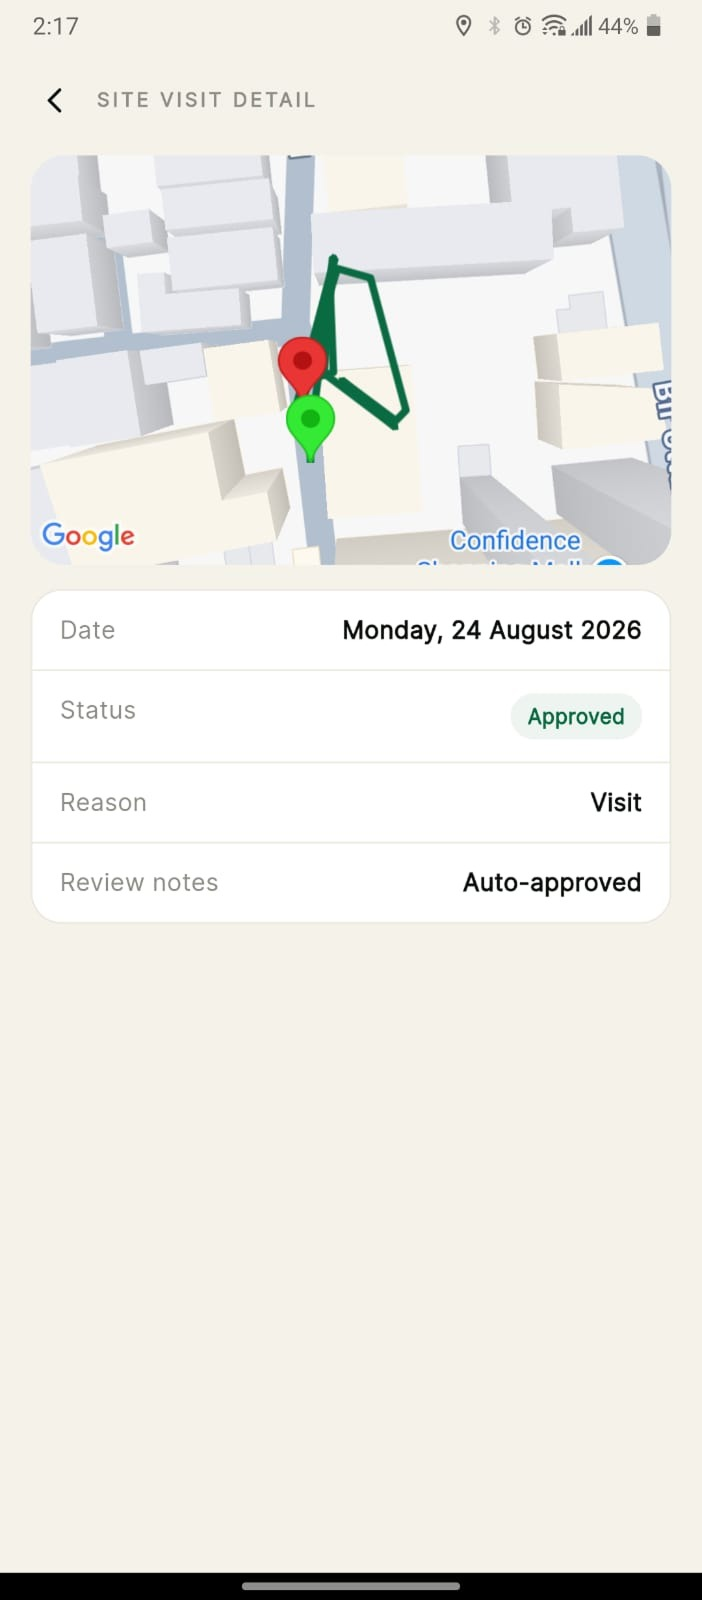
  3. বিস্তারিত পাতায় মানচিত্রে ভিজিটের অবস্থান এবং নিচে Date, Status, Reason ও Review notes দেখা যাবে।
সাইট ভিজিট ইতিহাসের তালিকা সাইট ভিজিটের বিস্তারিত
ছুটি (Leave)
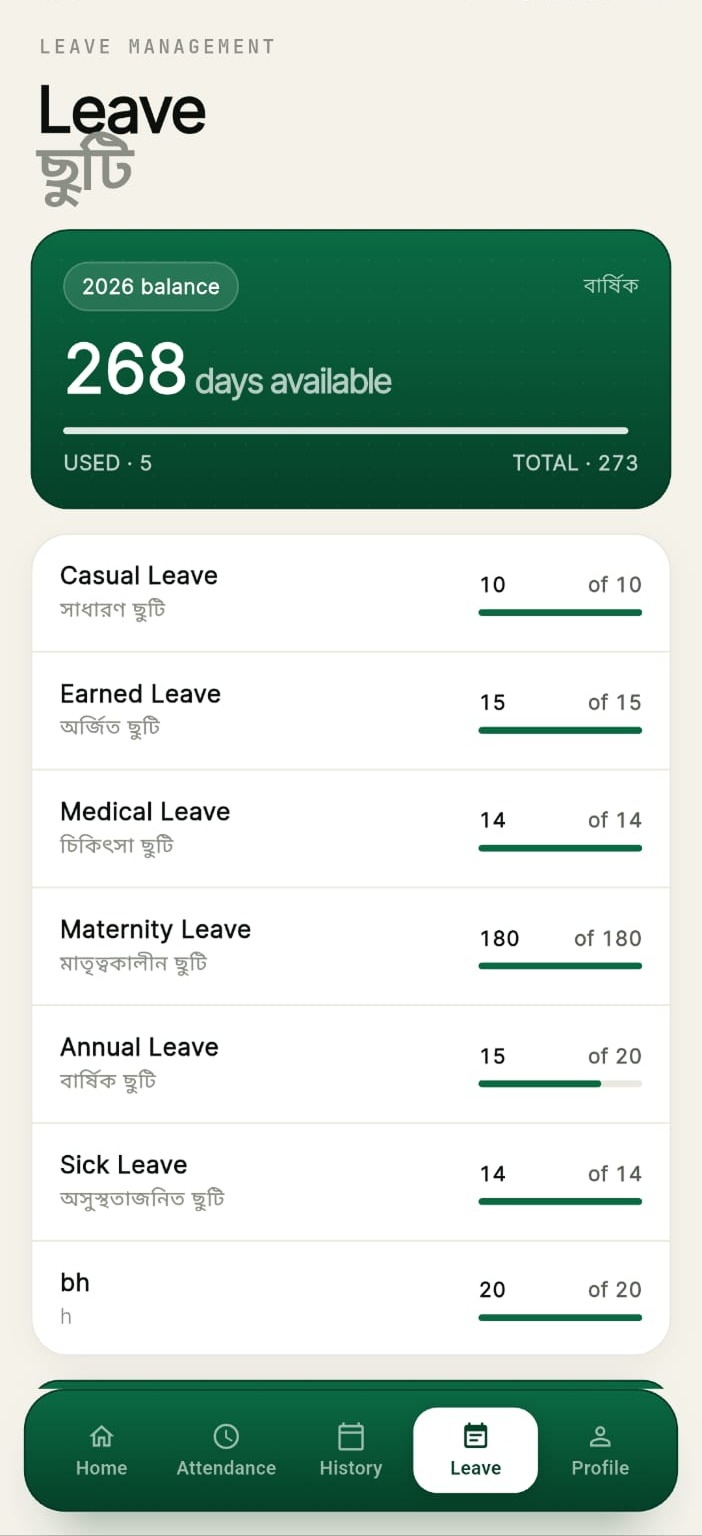
ছুটি ট্যাবে বছরের প্রাপ্য ছুটির হিসাব ও ধরনভিত্তিক বিবরণ দেখা যায়।
balance কার্ড — চলতি বছরের অবশিষ্ট দিন (days available), ব্যবহৃত (USED) ও মোট (TOTAL)।
ছুটির ধরন — সাধারণ ছুটি (Casual), অর্জিত (Earned), চিকিৎসা (Medical), মাতৃত্বকালীন (Maternity), বার্ষিক (Annual) ও অসুস্থতাজনিত (Sick) ছুটি; প্রতিটির পাশে অবশিষ্ট ও মোট দিন এবং অগ্রগতি রেখা।
ছুটির আবেদন — হোম স্ক্রিনের দ্রুত কাজ অংশে ছুটির আবেদন থেকে আবেদন করা যায়।
ছুটির হিসাব
সেটিংস ও সাইন আউট
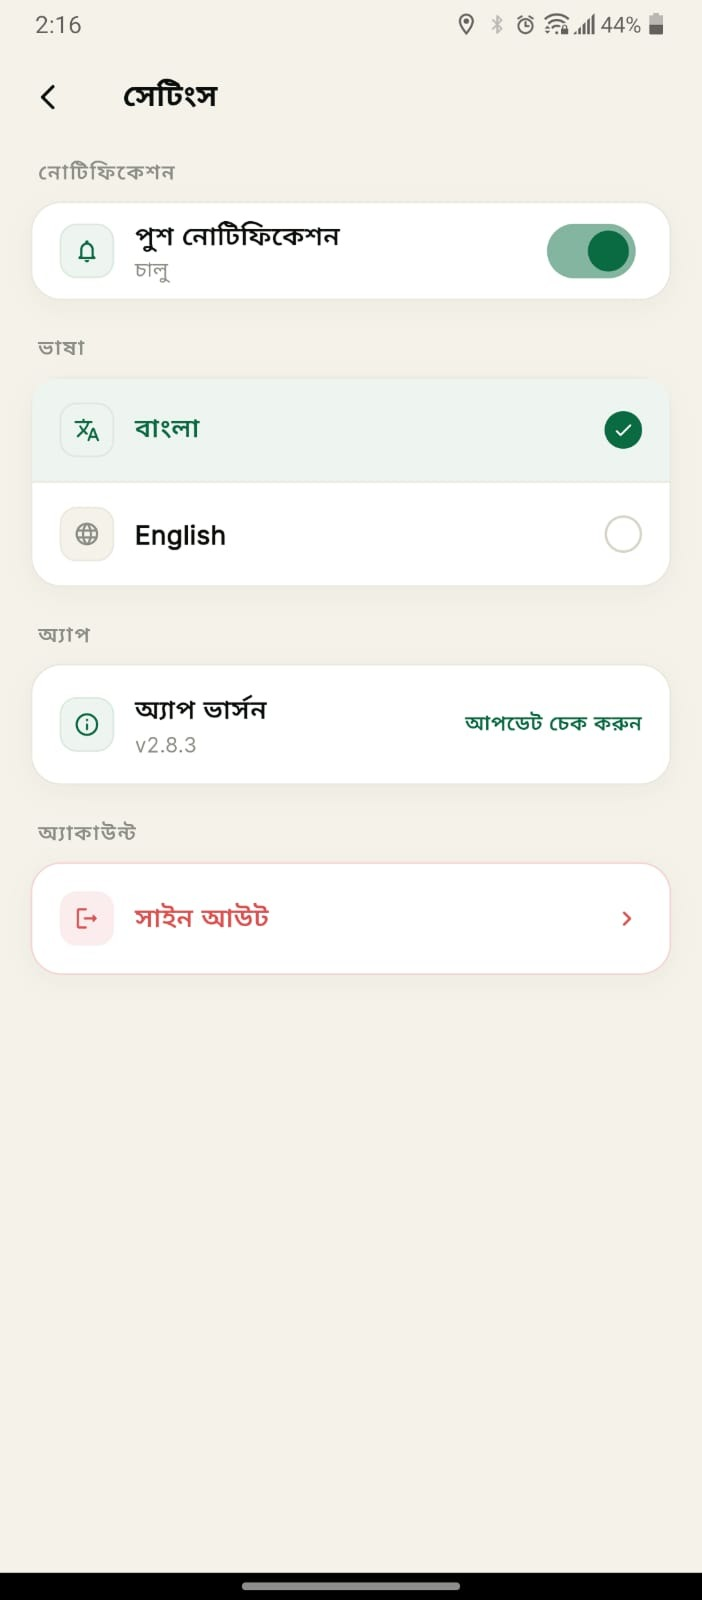
পুশ নোটিফিকেশন — চেক-ইন/চেকআউটের অনুস্মারক ও অনুমোদনের খবর চালু বা বন্ধ করা যায়।
ভাষা — বাংলা ও English-এর মধ্যে নির্বাচন করা যায়।
অ্যাপ ভার্সন — চলতি সংস্করণ দেখা যায়; আপডেট চেক করুন চেপে নতুন সংস্করণ আছে কি না দেখুন।
সাইন আউট — অ্যাকাউন্ট থেকে বেরিয়ে যেতে সাইন আউট চাপুন; পরবর্তীবার আবার SSO দিয়ে প্রবেশ করতে হবে।
সেটিংস স্ক্রিন
সাধারণ সমস্যা ও সমাধান
সমস্যাকরণীয়
পাসওয়ার্ড ভুলে গেছেনLSG সাইন ইন পাতার পাসওয়ার্ড ভুলে গেছেন? লিংকে চাপ দিয়ে নির্দেশনা অনুসরণ করুন।
লগইন করতে পারছেন না বা বদলি হয়েছেসহায়তার জন্য ০১৮৯৬০৪৭১১৭ বা ০১৮৯৬০৪৭১১১ নম্বরে যোগাযোগ করুন, অথবা সাপোর্ট টিকেট ব্যবহার করুন।
মানচিত্রে GPS ready আসছে নাফোনের লোকেশন সেবা চালু করুন, অ্যাপকে অনুমতি দিন, খোলা জায়গায় দাঁড়িয়ে অ্যাপটি বন্ধ করে আবার খুলুন।
চেক-ইন করা যাচ্ছে নাআপনি জিও-ফেন্স সীমানার বাইরে আছেন। উপরের দূরত্ব দেখে অফিস এলাকার ভেতরে গিয়ে আবার চেষ্টা করুন।
অফিসের বাইরে কাজ করতে হবেচেকআউট না করে সাইট ভিজিট রিকোয়েস্ট দিন এবং কারণ লিখে আবেদন জমা দিন।
চেকআউট করতে ভুলে গেছেনইতিহাস ট্যাব থেকে ওই তারিখের তথ্য যাচাই করে প্রশাসনিক শাখায় সংশোধনের জন্য জানান।
ডিভাইস পরিবর্তন করেছেননতুন ডিভাইস নিবন্ধনের জন্য অফিসের আইটি শাখায় যোগাযোগ করুন।
📲
Download the app Download the app from the Google Play Store or the App Store
Download ↓
Introduction

The Ministry of Land is a ministry of the People's Republic of Bangladesh. It is responsible for land management, land revenue collection, land survey and record-keeping, khas land management, and formulating and implementing land-related policy. Its field-level activities are carried out through the Divisional Commissioner's offices, Deputy Commissioner's offices, Upazila Land Offices, and Union Land Offices.

As part of expanding digital services, Bhumi Dristi — a geofence-based attendance system — has been launched to make attendance management for officers and staff simple, transparent, and accurate. Attendance is verified against the office's defined boundary (geofence), field site visits are logged with location, and working hours and leave are recorded automatically.

Geofence Attendance
Check in and check out only from within the office boundary.
Site Visit
Work outside the office is logged with approval.
Sign in with SSO
Secure login using LSG portal or GEMS credentials.
Before you start
Step-by-step guide
STEP 01
How to log in
You log into the app through the government's Single Sign-On (SSO) system. You don't need to create a separate account for the app — you can sign in using your LSG portal or GEMS credentials.
  1. Open the Bhumi Dristi app from your phone's home screen. The Ministry of Land splash screen will appear first.
  2. On the welcome screen, tap the green Sign in with SSO button. Below it you'll see — "You will be redirected to the LSG portal".
  3. The LSG Sign In page will open. Enter your Username and Password and tap Login.
  4. If you want to use your GEMS credentials, tap Login via GEMS at the bottom of the same page; enter your User Name / Email Address and Password there and tap Submit.
  5. Once verification succeeds, the app will take you directly to the home screen.
If the indicators at the bottom of the screen show Trusted device, Mock-GPS protected, and TLS 1.3, your device and connection are secure.
SSO sign in LSG sign in
What's on the LSG Sign In page
Username and Password — your credentials registered with the LSG portal.
Forgot password? — link to reset your password.
Register — registration for new users.
Emergency Instructions and Support Ticket — instructions and requests for help.
Login via GEMS — sign in with an alternate identity.
Support — if office users have trouble logging in or due to a transfer, contact: 01896047117, 01896047111.
GEMS login page
Home screen overview
This screen appears right after login. Your name and photo are at the top, and the day's attendance status is visible at a glance below.
Inside office — whether you are currently within the geofence boundary.
Ready to check in? — shows your shift start time along with a Check in now button; you can check in directly from here as well.
Quick actions — shortcuts to site visit, leave application, history, and settings.
Today's shift — start and end time and status (e.g. Pending).
Bottom menu — Home, Attendance, History, Leave, and Profile.
Home screen
STEP 02
How to check in
To check in, you must be within the office's defined geofence boundary (the green polygon on the map).
  1. Tap the Attendance tab from the bottom menu.
  2. Wait for the map to load. When GPS ready · Ready appears at the top left, location detection is complete; the badge below shows the distance from the boundary (e.g. 7.2 km).
  3. The card below will show Ready to check in, your office name, and a Device verified mark.
  4. Tap the green Check in button.
  5. Once check-in succeeds, the status becomes Session active · Active and the working-hours clock starts.
You cannot check in while outside the boundary. Check the displayed distance, move inside the office area, and try again.
Ready to check in — light map Ready to check in — dark map
Changing the map style
There are two buttons at the top-right corner of the map. Use them to switch between the light map and the dark map. The light map is easier to read in daylight and the dark map in low light. The check-in rules stay the same regardless of the map style.
STEP 03
How to check out
Checking out at the end of the workday calculates your total working hours for the day. If you don't check out, your attendance will remain incomplete.
  1. Go to the Attendance tab. You'll see Session active · Active at the top and Session active on the card below.
  2. On the green card, check the WORKING TIME (e.g. 01:15) and your check-in time (Since 10:49 AM).
  3. Tap the white Checkout button.
  4. If asked to confirm, review the details and confirm; if it's a mistake, cancel and go back.
  5. Once checkout is complete, the session ends and the day's record is saved in the History tab.
While the session is active, the distance from the boundary (e.g. 75 m) is shown at the top. If you need to leave the office, use a Site Visit Request instead of checking out.
Active session and checkout
STEP 04
Site visit request
If you need to leave the office for official work (field inspection, survey, hearing), you must submit a site visit request. This counts the time spent outside the office as working hours.
  1. On the Attendance tab, tap the Site Visit Request option on the active session card. If it's before check-in, use the Site Visit button next to the check-in card instead.
  2. Briefly enter the reason for the visit in the Reason for visit field (maximum 500 characters).
  3. Tap Submit request. If it's a mistake, tap Cancel to go back.
  4. Once submitted, the app records your location and time, and the approval status is visible under History → Site Visit.
Site visit request
Attendance history
History tab shows daily status on a monthly calendar.
  1. The Attendance and Site Visit tabs at the top let you view the two kinds of history separately.
  2. Change the time range by selecting Month, Week, or Range; use the arrows to move to the previous or next month.
  3. The three cards at the top summarize the month — PRESENT (days present), LATE (late days), and HOURS (total working hours).
  4. Calendar color meanings — Present, Late, Absent, and Holiday.
  5. Tapping a date shows that day's details in the Recent section below.
Attendance history calendar
Site visit history
The History → Site Visit section lists all your visits with their date and approval status.
  1. The list shows each visit's date, reason, and status (Approved, etc.).
  2. Tap View details to see more.
  3. The details page shows the visit location on a map, along with Date, Status, Reason, and Review notes below.
Site visit history list Site visit details
Leave
The Leave tab shows your yearly leave entitlement and a breakdown by type.
Balance card — remaining days for the current year (days available), USED, and TOTAL.
Leave types — Casual, Earned, Medical, Maternity, Annual, and Sick leave; each shows remaining and total days along with a progress bar.
Apply for leave — you can apply from Apply for Leave under Quick Actions on the home screen.
Leave balance
Settings and sign out
Push notifications — turn check-in/checkout reminders and approval updates on or off.
Language — choose between বাংলা and English.
App version — view the current version; tap Check for update to see if a new version is available.
Sign out — tap Sign out to log out of your account; you'll need to sign in via SSO again next time.
Settings screen
Common issues and solutions
IssueWhat to do
Forgot passwordTap Forgot password? on the LSG Sign In page and follow the instructions.
Can't log in, or you've been transferredContact 01896047117 or 01896047111 for support, or use the Support Ticket option.
Map doesn't show GPS readyTurn on your phone's location service, grant the app permission, stand in an open area, and close and reopen the app.
Can't check inYou are outside the geofence boundary. Check the displayed distance, move into the office area, and try again.
Need to work outside the officeSubmit a Site Visit Request instead of checking out, enter the reason, and submit.
Forgot to check outVerify that day's record from the History tab and report it to the administrative branch for correction.
Changed devicesContact your office's IT branch to register the new device.